Persistent Storage with Longhorn
This post covers installing Longhorn for distributed block storage — including handling Talos’s immutable OS, heterogeneous disk sizes, and creating a dedicated GPU-local StorageClass.
Why Longhorn?
The storage question for a homelab Kubernetes cluster usually comes down to two serious contenders: Rook-Ceph and Longhorn. Rook-Ceph is the heavyweight — it brings the full power of Ceph’s distributed storage engine into Kubernetes, with support for block, object, and file storage. It is the right choice for production environments with dedicated storage nodes and operations teams who can manage the complexity.
For a homelab, Rook-Ceph is overkill. It demands a minimum of three dedicated OSDs (Object Storage Daemons), each ideally on separate nodes with raw disks. The control plane components (monitors, managers, metadata servers) add significant memory and CPU overhead, and the operational burden of managing Ceph — understanding PG placement groups, recovery semantics, CRUSH maps — is a full-time education.
Longhorn takes the opposite approach. It is a lightweight, cloud-native distributed block storage system originally built by Rancher Labs. Each volume is an independent Linux process backed by a sparse file, and replication happens at the volume level rather than the cluster level. This makes it straightforward to reason about: a 3-replica volume simply means three copies of the data living on three different nodes.
For Frank, the Talos Cluster, Longhorn wins on three counts:
- No dedicated storage nodes. Every node contributes its local disk to the storage pool. The three mini nodes, gpu-1, pc-1, and both Raspberry Pis all participate.
- Simple operations. The Longhorn UI (bundled with the install) gives you a clear view of volume health, replica status, and node capacity. No CRUSH maps.
- Flexible data locality. Longhorn can place replicas anywhere for redundancy, or pin data to a specific node for performance — which is exactly what GPU workloads need.
Prerequisites: iSCSI Tools on Talos
Longhorn uses iSCSI under the hood to expose block devices to pods. On a traditional Linux distribution, you would install open-iscsi from the package manager and be done with it. Talos Linux has no package manager — the root filesystem is immutable and read-only. Instead, you install system extensions that get baked into the Talos image at boot time.
The iscsi-tools extension must be present on every node that will participate in Longhorn storage. In Frank, the Talos Cluster, that means all seven nodes. Using Omni, this is a single cluster-scoped patch:
# patches/phase03-longhorn/400-cluster-iscsi-tools.yaml
metadata:
  type: ExtensionsConfigurations.omni.sidero.dev
  id: 400-cluster-iscsi-tools
  labels:
    omni.sidero.dev/cluster: frank
spec:
  extensions:
    - siderolabs/iscsi-tools
The omni.sidero.dev/cluster: frank label applies this extension to every machine in the cluster. Omni handles the rest: it rebuilds each node’s boot image with the extension included, then performs a rolling reboot across the cluster.
Gotcha: This rolling reboot is not instant. Omni reboots nodes one at a time, waiting for each to rejoin the cluster before proceeding to the next. For a seven-node cluster, expect this to take roughly 15-20 minutes. Plan accordingly — do not apply this patch right before you need the cluster to be stable.
You can verify the extension is loaded after reboot by checking the extension list on any node:
talosctl -n 192.168.55.21 get extensionsLook for siderolabs/iscsi-tools in the output. If it is missing, the image rebuild did not include it — check the Omni UI for image build status.
Mounting Extra Disks on gpu-1
Most nodes in Frank, the Talos Cluster use their single internal disk for both the OS and Longhorn storage. The gpu-1 node is different. It has two Samsung 870 EVO 4TB SATA SSDs dedicated to storage — the kind of capacity you want available when training models or caching large datasets locally.
On a standard Linux system, you would partition and mount these drives with fdisk and fstab. On Talos, disk management is declarative — you describe the desired state in the machine config, and Talos handles partitioning and mounting.
This patch targets only gpu-1 (identified by its Omni machine UUID) and tells Talos to partition and mount both drives:
# patches/phase03-longhorn/401-gpu1-extra-disks.yaml
metadata:
  type: ConfigPatches.omni.sidero.dev
  id: 401-gpu1-extra-disks
  labels:
    omni.sidero.dev/cluster: frank
    omni.sidero.dev/cluster-machine: 03ff0210-04e0-05b0-ab06-300700080009
spec:
  data: |
    machine:
      disks:
        - device: /dev/sda
          partitions:
            - mountpoint: /var/mnt/longhorn-sda
        - device: /dev/sdb
          partitions:
            - mountpoint: /var/mnt/longhorn-sdb
A few things to note here:
- Mount paths live under
/var/mnt/. Talos’s root filesystem is read-only, but/var/is writable. Longhorn needs write access to its storage directories, so all custom mounts must go under/var/. - Talos will wipe the disks. When Talos sees a disk declaration in the machine config, it takes full ownership: existing partitions are destroyed, a new partition table is created, and the filesystem is formatted. The comment in the patch notes that
/dev/sdahad old Linux partitions — those are gone now. - The
cluster-machinelabel scopes this patch to gpu-1 only. Other nodes are unaffected.
After applying this patch and the node reboots, you can verify the mounts:
talosctl -n 192.168.55.31 mounts | grep longhornYou should see both /var/mnt/longhorn-sda and /var/mnt/longhorn-sdb listed as mounted filesystems. Later, when configuring Longhorn, you will point the gpu-1 node at these paths and tag them for GPU-local workloads.
$ talosctl -n 192.168.55.31 mounts 2>&1 | grep "/var/mnt/longhorn-s"
192.168.55.31   /dev/sda1                                                3998.83    112.11     3886.72         2.80%          /var/mnt/longhorn-sda
192.168.55.31   /dev/sdb1                                                3998.83    163.48     3835.36         4.09%          /var/mnt/longhorn-sdb
Installing Longhorn
With iSCSI available and disks mounted, Longhorn itself goes in via Helm. In Frank, the Talos Cluster, ArgoCD manages the Longhorn Helm release through an Application resource that references the upstream chart and a values file in the Git repo.
The ArgoCD Application pulls Longhorn chart version 1.11.0 from the official charts.longhorn.io repository, with values sourced from the Git repo:
# apps/root/templates/longhorn.yaml (abbreviated)
spec:
  sources:
    - repoURL: https://charts.longhorn.io
      chart: longhorn
      targetRevision: "1.11.0"
      helm:
        releaseName: longhorn
        valueFiles:
          - $values/apps/longhorn/values.yaml
The values file itself is deliberately minimal — Longhorn’s defaults are sensible, and the goal is to override only what matters:
# apps/longhorn/values.yaml
defaultSettings:
  defaultReplicaCount: 3
  storageMinimalAvailablePercentage: 15
  nodeDownPodDeletionPolicy: delete-both-statefulset-and-deployment-pod
  defaultDataLocality: best-effort

persistence:
  defaultClassReplicaCount: 3
  defaultClass: true
Let’s walk through each setting:
defaultReplicaCount: 3 — Every volume gets three replicas spread across different nodes by default. With seven nodes in the cluster, this provides solid redundancy. Losing any two nodes still leaves one healthy copy.
storageMinimalAvailablePercentage: 15 — Longhorn will stop scheduling new replicas on a node once its available storage drops below 15%. This prevents any single node from filling up completely, which would cause iSCSI target failures and degraded volumes.
nodeDownPodDeletionPolicy: delete-both-statefulset-and-deployment-pod — When a node goes down, Longhorn will immediately delete the pods using volumes on that node. This allows Kubernetes to reschedule them elsewhere rather than leaving them stuck in a Terminating state. For a homelab where nodes might reboot for patches or power issues, this is the pragmatic choice.
defaultDataLocality: best-effort — This tells Longhorn to try to keep at least one replica on the same node as the pod consuming the volume. “Best-effort” means it will do this when possible but will not block scheduling if the local node has no space. This improves read performance without sacrificing scheduling flexibility.
defaultClass: true — The Longhorn StorageClass becomes the cluster’s default. Any PersistentVolumeClaim that does not specify a StorageClass will get a Longhorn volume.
GPU-Local StorageClass
The default three-replica, best-effort configuration is the right choice for most workloads — application databases, config stores, log buffers. But GPU workloads have different requirements. When a model training job on gpu-1 reads a 50GB dataset, you want that data on a local disk, not coming across the network from a replica on a Raspberry Pi.
For this, there is a second StorageClass deployed as a raw manifest through the longhorn-extras ArgoCD Application:
# apps/longhorn/manifests/gpu-local-sc.yaml
apiVersion: storage.k8s.io/v1
kind: StorageClass
metadata:
  name: longhorn-gpu-local
provisioner: driver.longhorn.io
reclaimPolicy: Delete
volumeBindingMode: Immediate
allowVolumeExpansion: true
parameters:
  numberOfReplicas: "1"
  dataLocality: strict-local
  diskSelector: "gpu-local"
Three parameters make this StorageClass distinct:
numberOfReplicas: "1" — Only one copy of the data. There is no point replicating GPU scratch data to other nodes; if gpu-1 goes down, the training job is gone regardless. A single replica eliminates replication overhead and doubles the effective write throughput.
dataLocality: strict-local — Unlike best-effort, this is a hard constraint. The single replica must live on the same node where the consuming pod runs. If the data cannot be placed locally, the volume attachment fails rather than silently falling back to a remote replica.
diskSelector: "gpu-local" — This restricts volume placement to disks tagged with the gpu-local label. After Longhorn is running, you tag gpu-1’s extra disks in the Longhorn UI (or via the Longhorn API): navigate to the gpu-1 node, find the /var/mnt/longhorn-sda and /var/mnt/longhorn-sdb disks, and add the gpu-local tag. Only those 8TB of dedicated SSD capacity will serve volumes from this StorageClass.
The longhorn-extras Application that manages this manifest is straightforward — it points ArgoCD at the apps/longhorn/manifests/ directory and applies everything it finds:
# apps/root/templates/longhorn-extras.yaml (abbreviated)
spec:
  source:
    repoURL: https://github.com/derio-net/frank.git
    path: apps/longhorn/manifests
This pattern of splitting Helm-managed resources from raw manifests into separate ArgoCD Applications is a useful convention. It keeps the Helm values file focused on chart configuration and avoids the complexity of post-install hooks or custom chart templates for one-off resources.
Exposing the Longhorn UI
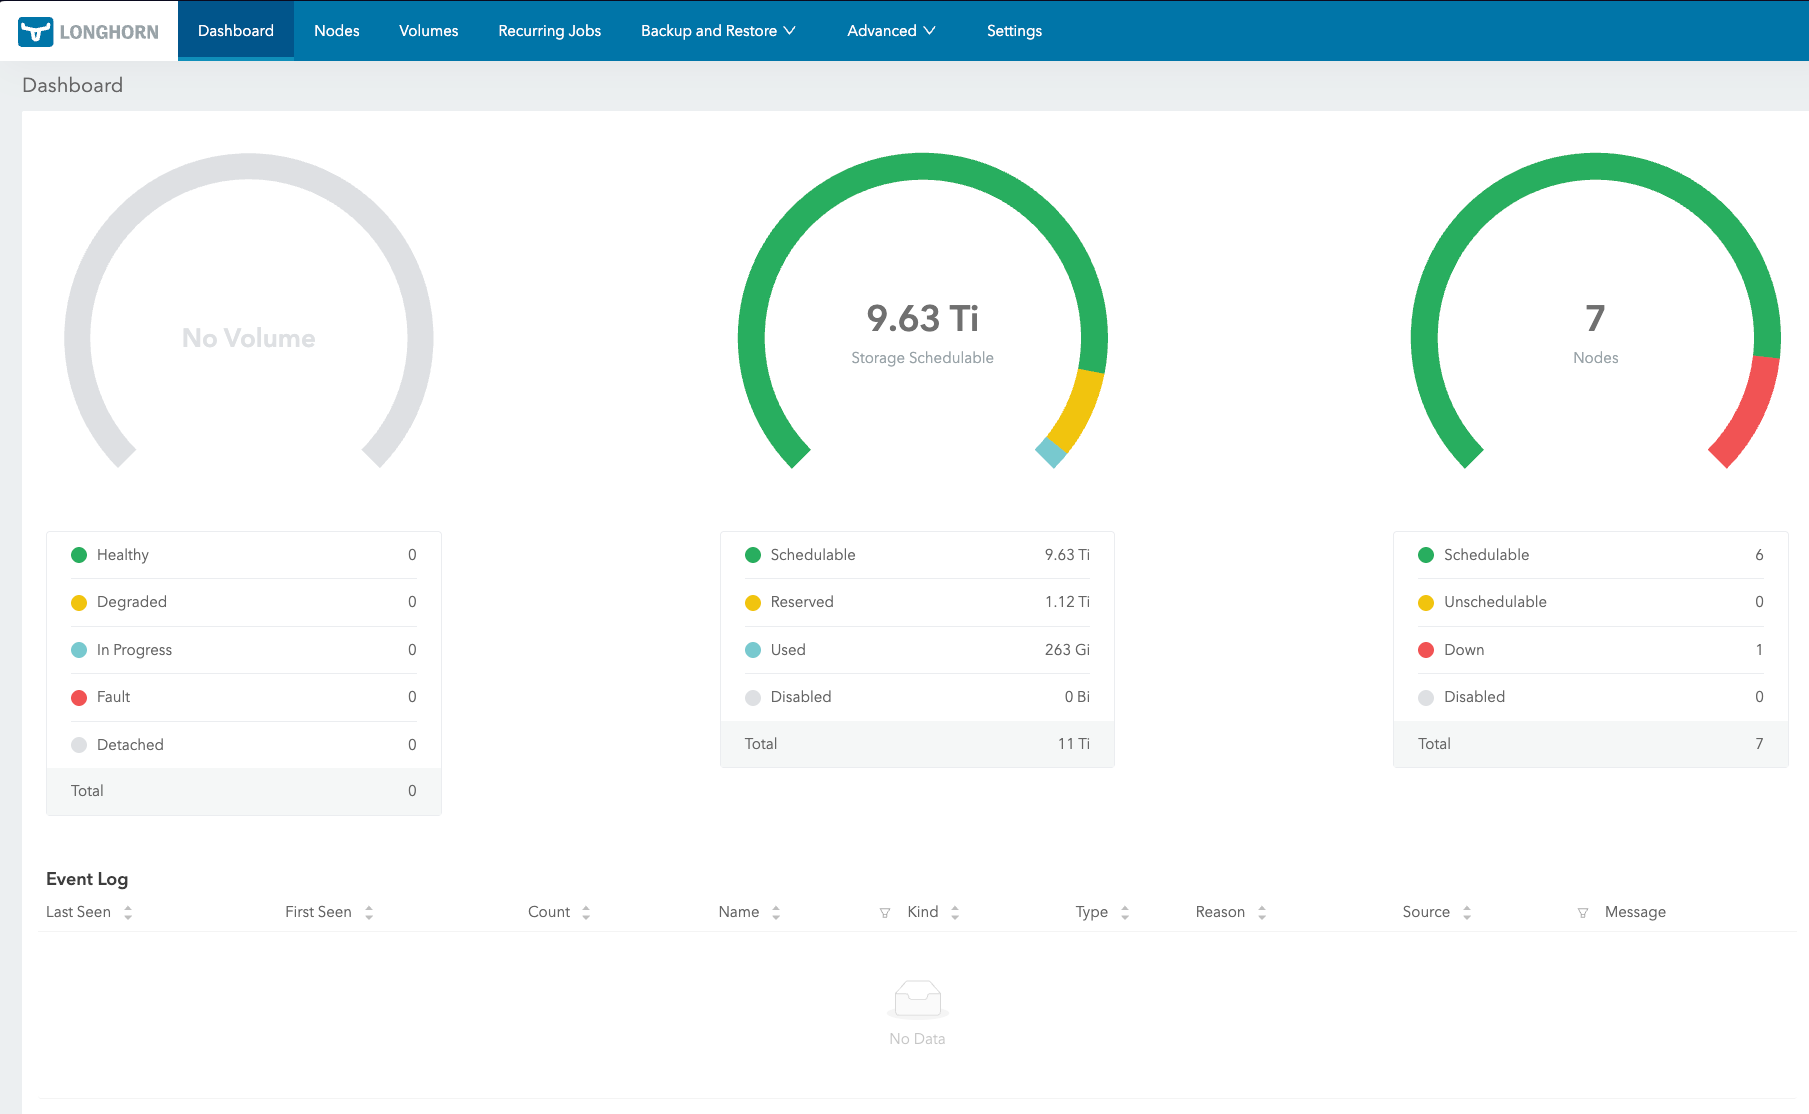
Longhorn ships a web UI that shows volume health, replica status, and node capacity at a glance. By default it runs as a ClusterIP service (longhorn-frontend), which is only reachable from inside the cluster. For a homelab, you want it on the LAN.
Using the same Cilium L2 LoadBalancer pattern as ArgoCD, a second service manifest in the longhorn-extras directory exposes the UI at a fixed IP:
# apps/longhorn/manifests/ui-service.yaml
apiVersion: v1
kind: Service
metadata:
  name: longhorn-ui-lb
  namespace: longhorn-system
  annotations:
    io.cilium/lb-ipam-ips: "192.168.55.201"
spec:
  type: LoadBalancer
  selector:
    app: longhorn-ui
  ports:
    - name: http
      port: 80
      targetPort: http
The io.cilium/lb-ipam-ips annotation pins the service to 192.168.55.201. Because this manifest lives in apps/longhorn/manifests/, the existing longhorn-extras ArgoCD Application picks it up alongside the GPU-local StorageClass — no new Application CR needed.
The Longhorn dashboard is then reachable at http://192.168.55.201 from any machine on the LAN.
Using the StorageClasses
With both StorageClasses in place, workloads choose their storage strategy through their PVC spec. A standard application uses the default class implicitly:
apiVersion: v1
kind: PersistentVolumeClaim
metadata:
  name: app-data
spec:
  accessModes: ["ReadWriteOnce"]
  resources:
    requests:
      storage: 10Gi
A GPU workload requests gpu-local storage explicitly:
apiVersion: v1
kind: PersistentVolumeClaim
metadata:
  name: model-cache
spec:
  storageClassName: longhorn-gpu-local
  accessModes: ["ReadWriteOnce"]
  resources:
    requests:
      storage: 200Gi
The strict-local data locality combined with the gpu-local disk selector ensures this volume lands on one of gpu-1’s 4TB SSDs, right next to the GPU that will process its contents.
$ kubectl get storageclass
NAME                 PROVISIONER          RECLAIMPOLICY   VOLUMEBINDINGMODE   ALLOWVOLUMEEXPANSION   AGE
longhorn (default)   driver.longhorn.io   Delete          Immediate           true                   48d
longhorn-cicd        driver.longhorn.io   Delete          Immediate           true                   22d
longhorn-gpu-local   driver.longhorn.io   Delete          Immediate           true                   48d
longhorn-static      driver.longhorn.io   Delete          Immediate           true                   48d
What We Have Now
At this point the cluster has:
- Distributed 3-replica block storage across all 7 nodes
- GPU-local StorageClass for high-performance single-node workloads on gpu-1
- Longhorn UI exposed at
http://192.168.55.201for storage management - Automatic volume rebalancing and health monitoring
References
- Longhorn — Cloud-native distributed block storage for Kubernetes (CNCF incubating)
- Longhorn Concepts and Architecture — How Longhorn engines, replicas, and volumes work
- Longhorn StorageClass Parameters — Reference for numberOfReplicas, dataLocality, diskSelector, and more
- Talos Linux Storage Guide — iSCSI prerequisites and CSI setup on Talos
- Talos System Extensions — Official Talos Linux system extensions repository (includes iscsi-tools)
- Rook-Ceph — Cloud-native storage orchestration for Kubernetes using Ceph
- Kubernetes Persistent Volumes — Official PV and PVC documentation